How to rename a mysql database

There isn’t a simple command to rename a mysql database. You just need to create a new database and then rename all the tables like so:

RENAME TABLE old_db.table_name TO new_db.table_name

There is also an alternative method by dumping the old database and importing it again like so:

mysqldump -v oldDatabase > oldDump.sql
mysqladmin create newDatabase
mysql newDatabase < oldDump.sql

I have found the second option to be alot faster both in time and on the disk.

How to install wildcard certificates on multiple servers

If you have a wildcard certificate (for example *.randomhacks.co.uk) you might need to install it on multiple servers which host the different subdomains.

Basically, don’t rekey the certificate for each server just copy the same keys and certificate files across all the servers. If you rekey the certificate each time then you will invalidate any certificates which used the old key.

Typically you would need to copy these files:

/etc/ssl/private/wildcard.randomhacks.key
/etc/ssl/private/wildcard.randomhacks.sf_bundle.crt
/etc/certs/wildcard.randomhacks.crt

Note: GoDaddy let you use their wildcard certificates across an unlimited number of servers. However if you are using another certificate provider you might need to check that they don’t have a limited.

How to change /etc/apt/sources.list to use local apt-cache server in a single sed command

I’ve just installed an Ubuntu apt-cache server on our local network to speed up downloading packages each time we install or upgrade an Ubuntu computer. However, changing all the /etc/apt/sources.list file for every computer in the office is a real pain. Here is a simple command using sed which does this automatically for you:

The apt-cache server in our office is 192.168.2.2 but obviously change this to suit your needs. Note: the command can be run multiple times and won’t change the result:

 sed -i '/192.168\|^#/! s/http:\/\//http:\/\/192.168.2.2:3142\//g' /etc/apt/sources.list 

Hope this helps someone.

How to resize a qcow2 harddrive images

I usually make the hard drives on my virtual machines as small as possible to save disk space on the host. I do this because it is reasonably easy to resize them at a later date (especially if you using LVM). Anyhow here is a quick guide to resizing a qcow2 disk image.

1 – Shutdown the guest.. It’s important to shutdown the vm properly rather than pausing it or forcing it to a stop because you need the file system to be a perfect condition before resizing it.

virsh shutdown hostname

2 – Increase the qcow2 disk. It a simple command to increase the size of the disk. Here I am adding 5GB to an Ubuntu Server disk.

qemu-img resize ubuntu-server.qcow2 +5GB

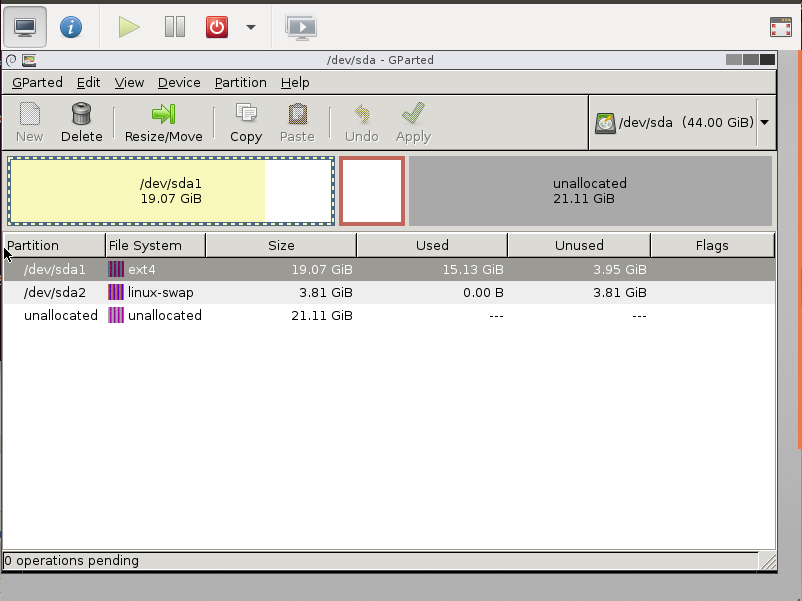
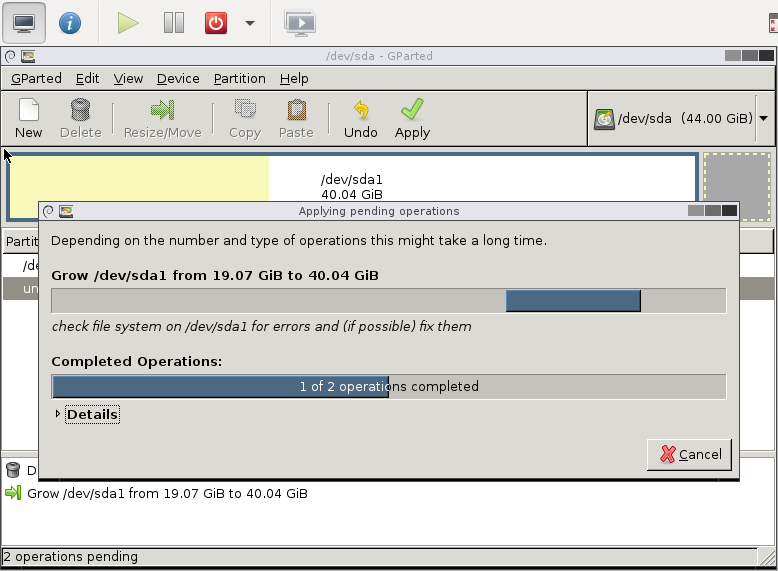
3 – Resize the partition Now that the virtual disk has been resized you need to resize the guest’s partitions within the image. I recommend using a small live Linux distrobution such as GParted Live. First download an iso image of GParted and attach it to the virtual machine by editing the vm settings.

virsh edit hostname

Add a boot order at the top. By default there will be one node that should read:

<boot dev='hd'/>

Simply change this to:

<boot dev='cdrom'/>

Add a cdrom after the hard disk. Make sure to change the /path/to/image.iso to the ISO image you want to boot from. If you don’t set this correctly the VM will not boot.

<disk type='file' device='cdrom'/> 
<source file='/mnt/iso/gparted-live-0.16.1-1-i486.iso'/>
<target dev='hdc' bus='ide'/>
<readonly/>
</disk>

Finally, start the VM and VNC into it. I tend to use Virtual Machine Manager to connect to a VM. It works brilliantly on most Linux machines. You should then be able to use GParted to increase the size of the partition.

resizing_qcow_image_using_gparted

how_to_resize_a_qcow_file_using_gparted

4 – Start the VM backup Note: Unless you really need it – I generally edit the VM and remove the cdrom and boot order by reversing the step described above.

virsh start hostname

How to add a new user to Ubuntu

I find adding a new user in Ubuntu really confusing. Surely there should be a wizard program for it? Anyhow, for my records here is how I do it.

Create the user

useradd -d /home/username/ -m username

Set the users password

passwd username

Then I log in as the user

su user

Change the shell to /bin/bash

chsh

You can make the user a sudoer / administrator by using the massively confusing script name called adduser

Ubuntu 10:04

adduser username root

Ubuntu 13.04

adduser username admin

Ubuntu 14.04

adduser username sudo

Ubuntu 16.04

usermod -aG sudo username

How keep multiple Ubuntu servers up to date

Once you have over three Ubuntu servers or desktops to manage it can be really useful to have a tool to help keep all their packages up to date. Put simply, you can’t keep logging into to each computer, checking and installing updates manually. I am not talking about configuring Ubuntu in the first place (you would do this is Ansible / Puppet etc). I’m just talking about installing periodic package upgrades.

For me the specific technical requirements of this tool would be:

  • The ability to see the state of all servers on one screen
  • Granular control to upgrade a single or multiple servers at once.
  • Granular control to upgrade a single or multiple or all packages at once

The general user / business requirements would be:

  • A simple easy to use piece of software with fast learning curve.
  • Good security protocols.
  • Good value for money.
  • Well maintained
  • Open source (optional)

I did some research, I found and tested following tools:

  • apt-dater – This is my preferred solution. Apt-Dater is an easy to use command line tool. The command line apperance is actually an advantage over a web based system because you can actually ssh into the computer directly from apt-dater itself. I.e. you can can see the packages being installed and then ssh in to fix any issues if they occur. It is very easy to configure.
  • using-apt-dater-to-kept-multiple-server-update

  • Ubuntu Landscape – This is a paid for, closed source, hosted service run by Cannonical and is design specifically for Ubuntu. It was the only tool I found with a web interface and coming with lots of additional features like monitoring. To test it, I signed up and used it for a year on two servers. It was really easy to use and met all my technical requirements. However it has one major problem… frankly it was poor value for money. The problem stems from the fact that you can only purchase the server management tools as part of a complete support package called Ubuntu Advantage. I generally don’t need support just the tools and a manual. However, when I tested the support they let me down. It was a lot slower and provided lower quality solutions than simply using a combination of Google and AskUbuntu. At the time of writing, it cost £201.68 per server. I have around 18 servers + 6 desktops and so if I rolled it out to all servers it would cost £4,015.24 per year. I normally think of IT investment over a 5 year period and would have spent over £20,000 in this time. This isn’t outragous for support but it is if you just want Landscape. Therefore, I could invest a little more time finding an alternative.
  • Puppet / Chef / Ansible etc – Using a server configuration tool might be another approach. You can configure these configuration tools to update the packages to the latest versions. However, once your server setup becomes more complex, it is impractical to completely automate the upgrading of packages. What if you don’t want MySQL upgrade as soon it hits the repositories? What happens if the kernel is upgraded? I feel it is a good idea to look at the upgrades before they are implemented and I don’t think that you can acheive this using these configuration tools.
  • cront-apt/apticron – Obviously, you could use a simple cron script to automatically upgrade the servers at say 3am every day. However, like configuration tools, I feel you need to look at the upgrades before they are implemented.

How to convert VirtualBox vdi to KVM qcow2

It is very easy to convert a VirtualBox .vdi disk images to KVM qcow2 file. You have to use the RAW file format as an intermediate.

1 – Make sure the VirtualBox machine is shutdown.

2 – Convert the vdi to a raw disk images. Note: vdi are compressed and raw images are not and so you will need to leave enough disk space for entire uncompressed disk.

VBoxManage clonehd --format RAW vm.vdi vm.img

3 – Then on your KVM host:

qemu-img convert -f raw vm.img -O qcow2 vm.qcow2

Hope this is helpful.

How to mount a qcow2 disk image on Ubuntu

This is a quick guide to mounting a qcow2 disk images on your host server. This is useful to reset passwords, edit files, or recover something without the virtual machine running.

Step 1 – Enable NBD on the Host
You will need to enable the nbd (network block device) kernel module on the host. This should be available on all Ubuntu servers after Intrepid.

sudo modprobe nbd max_part=8

Step 2- Connect the QCOW2 as network block device
Use qemu-nbd to connect your qcow2 file as a network block device. Note: You will need to specify the full path of qcow2 file even if you are the directory of the qcow files.

sudo qemu-nbd --connect=/dev/nbd0 /mnt/kvm/wordpress-sites.qcow2

Step 3 – Find The Virtual Machine Partitions
You can find a list of the partitions on the vm using the following command

sudo fdisk /dev/nbd0 -l

Step 4 – Mount the partition from the virtual machine.
For example, I want to mount partition 1 and therefore run:

 sudo mount /dev/nbd0p1 /mnt/somepoint/

Step 5 – Browse Your VM
You can then just browse the files in mnt/somepoint/

Afterwards unmount:

 sudo umount /mnt/somepoint/

Then disconnect the disk:

sudo qemu-nbd --disconnect /dev/nbd0